Followers

Friday 29 July 2011

Summer fun.....


Picture the scene.....sun lounger, Pimms, golden sandy beach, clear blue sky and a huge, yummy ice cream sundae smothered in chocolate and caramel sauce with nuts and a wafer on the side.
So I went into the garden on this cloudy day to photograph my card on my hydrangea bush! Not quite the picture I had in mind but my Hydrangea is very nice this year!
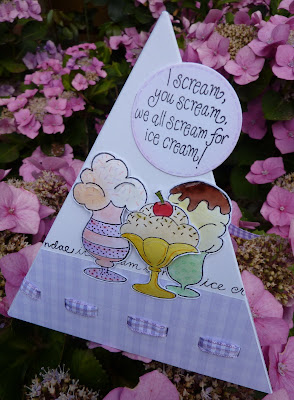
Back to the card.... I've used Woodware triangle cards, stuck two together covering the base with patterned papers. Punch holes for the ribbon and stamp the message across the top of the patterned paper.
Stamp the ice creams on white card, colour with watercolour pencils, cut out and decorate with glossy accents. Once dry attach to the card with silicone glue. Add another message on a punched circle to finish. The stamp is my JGCL507 Ice Cream Parfait and as you can see from the photos, it makes a nice alternative to a flat card.
Now where did I put the sun cream?


Saturday 23 July 2011

A Touch of Pink...and a sneaky peek!


I have two pictures for you today... a pink dragon (no relation to the nasty dog in Harry Potter) called Fluffy. She's coloured using Sakura pens and water colour pencils to give her that sparkle appeal dragons just love!
The base card is made using Woodware craft card. The gems are pink candy bon bons and I have stamped the message onto white shrink plastic. The name 'Fluffy' is stamped using a wonderful Stampendous set called Retro Alphabet code SSC055. I love using alphabet sets - so versitile - they allow you to write any message you want to make your cards even more personal.
Having just finished all my card samples for the Winter 2011 Woodware catalogue here is a 'sneaky peek' of one of my designs, sorry can't show you the whole image as that would spoil the surprise when the catalogue comes out.

Hope you like it!

Monday 11 July 2011

Wall Art


Anything but a card......well let me see what I can make.....I'll need one 12"x12" box frame, a fabulous piece of art work and a nice to wall to hang it on. Bingo!
My bubble butterflies (stamp set JGCL542) are not just for cards and this big piece I did earlier this year while looking after my parents for a few weeks certainly filled any spare time I had.
It's so therapeutic filling in all those bubbles with buttons, beads and bling.
I've also included a close up of some of the colour ways you can choose.


Tuesday 5 July 2011

Woodware sketch challenge


The main element on this card, besides the lovely flower of course, is the panel made from strips of Magenta papers. I learnt the technique with Susan Pickering Rothermel and just love making them!
I've used USArtQuest products and Magenta papers. Us
ing a piece of thick chipboard, any size will do, cover it with Great Tape (PPA201). Cut up a collection of patterned papers into strips of different widths and lengths.
Begin with one piece and stick to the sticky chipboard, continue to cover the chipboard creating a mosaic design all over. Don't worry if your strips are too long and hang over the edge.
Once you have covered the chipboard trim any strips. Take a contrasting ink pad and colour the edges of the chipboard. Using Perfect Paper Adhesive in gloss (PPA104) pour a generous fifty pence piece size piece of glue into the centre of the chipboard and spread around the surface using a palette knife (or an old credit card!), add more glue if need be. Allow to dry. This can take about an hour.
The finished result is a glossy masterpiece! Want to be more creative? Why not sprinkle Mica Flakes, Mica Delights or micro beads all of which are available from Woodware.

Product list.....
Crafty Edger
Magenta papers
Great Tape
Perfect Paper Adhesive
Floral Punch Book 1 for flower instructions
Orange punches, balloon, daisy and snowflake to make the flower
FPC tools and mat
Woodware gems
Woodware 826-28 swirl punch
Brown gingham ribbon
Peeloffs 92664

Tabitha looking cute

Tabitha looking cute
Look, I’ve just caught you another mouse!